Use the Interactive REPL window
- Article
- 07/15/2023
In this article
Applies to:

Visual Studio

Visual Studio for Mac

Visual Studio Code
Previous step: Write and run code
Python용 Visual Studio Interactive Window은 일반적 편집-빌드-디버그 주기를 크게 단축하는 풍부한 REPL(읽기-평가-인쇄-루프) 환경을 제공.
Interactive Window 은 Python 명령줄의 REPL 환경에 대한 모든 기능을 제공.
또한 명령줄에서는 번거로운 코드를 Visual Studio editor에서 소스 파일과 쉽게 교환할 수 있습니다.
The Visual Studio Interactive Window for Python provides a rich read-evaluate-print-loop (REPL) experience that greatly shortens the usual edit-build-debug cycle. The Interactive Window provides all the capabilities of the REPL experience of the Python command line. It also makes it easy to exchange code with source files in the Visual Studio editor, which is otherwise cumbersome with the command line.
Note
REPL 관련 문제의 경우, ipython 및 ipykernel packages가 설치되어 있는지 확인하고, 패키지 설치에 대한 도움말은 Python environments packages tab을 참조.
For issues with REPL, be sure to have ipython and ipykernel packages installed, and for help installing packages, see Python environments packages tab.
1. Solution Explorer에서 프로젝트의 Python environment(예: 이전 그래픽에 표시된 Python 3.6(32비트))을 마우스 오른쪽 단추로 클릭하고 Open Interactive Window를 선택, Interactive Window을 엽니다.
또 다른 방법은 기본 Visual Studio 메뉴에서 View > Other Windows > Python Interactive Windows을 선택.
Open the Interactive Window by right-clicking the project's Python environment in Solution Explorer (such as Python 3.6 (32-bit) shown in an earlier graphic) and selecting Open Interactive Window. Another way is, to select View > Other Windows > Python Interactive Windows from the main Visual Studio menu.
2. 표준 >>> Python REPL 프롬프트가 있는 편집기 아래에 대화형 창이 열립니다. Environment drop-down list을 사용하면 작업할 특정 인터프리터를 선택. Interactive Window을 더 크게 만들려면 아래 이미지에 표시된 대로 두 창 사이의 구분선을 드래그하면 됩니다.
The Interactive Window opens below the editor with the standard >>> Python REPL prompt. The Environment drop-down list allows you to select a specific interpreter to work with. If you'd like to make the Interactive Window larger you can drag the separator between the two windows, seen in the image below:

Tip
1. 경계구분기호를 끌어 Visual Studio에서 모든 창의 크기를 조정할 수 있습니다. Visual Studio 프레임과 별도로 창을 끌어서 프레임 내에서 원하는 대로 다시 정렬할 수도 있습니다. 자세한 내용은 창 레이아웃 사용자 정의를 참조하세요.
You can resize all of the windows in Visual Studio by dragging the bordering separators. You can also drag windows out independently of the Visual Studio frame, and rearrange them however you like within the frame. For complete details, see Customize window layouts.
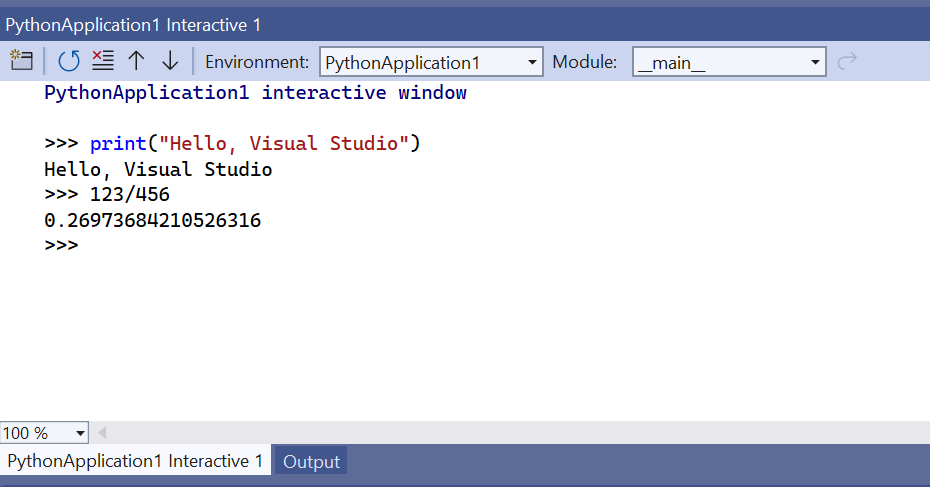
2. 즉각적 결과를 보려면 print("Hello, Visual Studio")와 같은 몇 가지 문과 123/456과 같은 표현식을 입력하세요.
Enter a few statements like print("Hello, Visual Studio") and expressions like 123/456 to see immediate results:
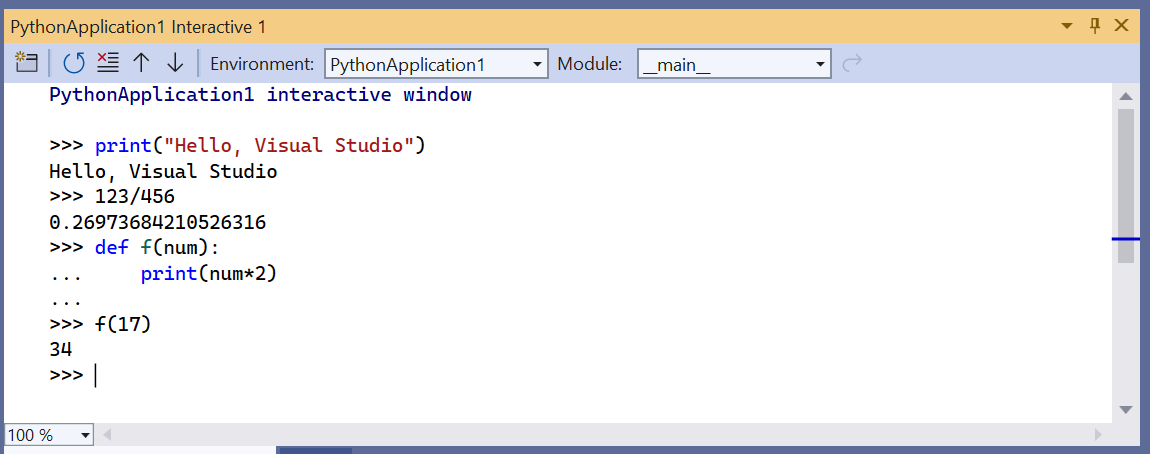
여러 줄 문(예: 함수 정의) 작성을 시작하면 대화형 창에 연속 줄에 대한 Python의 ... 프롬프트가 표시됩니다.
명령줄 REPL과 달리 이는 자동 들여쓰기를 제공합니다.
Shift+Enter를 눌러 새 ... 줄을 추가할 수 있습니다.
When you start writing a multiline statement (like a function definition), the Interactive Window shows Python's ... prompt for continuing lines. Unlike the command-line REPL, this will provide automatic indentation. You can add a new ... line by pressing Shift+Enter:
Interactive Window은 입력한 모든 내용의 전체 기록을 제공하고, 여러 줄 기록 항목을 사용하여 명령줄 REPL을 개선합니다.
예를 들어, 함수를 한 줄씩 다시 생성하는 대신 f 함수의 전체 정의를 단일 단위로 쉽게 호출하고 이름을 make_double로 쉽게 변경할 수 있습니다.
The Interactive Window provides a full history of everything you've entered, and improves upon the command-line REPL with multiline history items. For example, you can easily recall the entire definition of the f function as a single unit and easily change the name to make_double, rather than re-creating the function line by line.
Visual Studio는 편집기 창에서 Interactive Window으로 여러 줄의 코드를 보낼 수 있습니다.
이 기능을 사용하면 소스파일의 코드를 유지관리하고 선택한 조각을 Interactive Window으로 쉽게 보낼 수 있습니다.
그러면 전체 프로그램을 실행할 필요 없이 신속한 REPL 환경에서 이러한 코드 조각으로 작업할 수 있습니다.
이 기능을 보려면 먼저 PythonApplication1.py파일의 for 루프를 아래 코드로 바꾸세요.
Visual Studio can send multiple lines of code from an editor window to the Interactive Window. This capability allows you to maintain code in a source file and easily send the chosen fragments to the Interactive Window. You can then work with such code fragments in the rapid REPL environment rather than having to run the whole program. To see this feature, first replace the for loop in the PythonApplication1.py file with the code below:
Python
# Create a string with spaces proportional to a cosine of x in degrees
def make_dot_string(x):
return ' ' * int(20 * cos(radians(x)) + 20) + 'o'
.py 파일에서 import, from 및 make_dot_string 함수 문을 선택.
선택한 텍스트를 마우스 오른쪽 버튼으로 클릭하고 Send to Interactive를 선택(또는 Ctrl+Enter 누르기).
코드 조각은 Interactive Window 에 즉시 붙여넣어져 실행됨.
코드에 함수가 정의되어 있으므로 함수를 몇 번 호출하여 해당 함수를 빠르게 테스트할 수 있습니다.
Select the import, from, and make_dot_string function statements in the .py file. Right-click the selected text and chose Send to Interactive (or press Ctrl+Enter). The code fragment is immediately pasted into the Interactive Window and run. Because the code has defined a function, you can quickly test that function by calling it a few times:

Tip
선택하지 않고 편집기에서 Ctrl+Enter를 사용하면 Interactive Window에서 현재 코드 줄이 실행되고 자동으로 caret이 다음 줄에 배치됩니다.
이 기능을 사용하면 Ctrl+Enter를 반복적으로 누르면 Python 명령줄만으로는 불가능한 편리한 코드 단계별 실행 방법이 제공됩니다.
또한 디버거를 실행하지 않고 프로그램을 처음부터 시작하지 않고도 코드를 단계별로 실행할 수 있습니다.
아래 코드 조각과 같이 모든 소스에서 여러 줄의 코드를 복사하여 Interactive Window에 붙여 넣을 수도 있습니다.
이는 Python 명령줄 REPL로는 수행하기 어렵습니다.
붙여넣으면 Interactive Window은 해당 코드를 입력한 것처럼 실행합니다.
Using Ctrl+Enter in the editor without a selection runs the current line of code in the Interactive Window and automatically places the caret on the next line. With this feature, pressing Ctrl+Enter repeatedly provides a convenient way to step through your code that is not possible with only the Python command line. It also lets you step through your code without running the debugger and without necessarily starting your program from the beginning.
You can also copy and paste multiple lines of code into the Interactive Window from any source, such as the snippet below, which is difficult to do with the Python command-line REPL. When pasted, the Interactive Window runs that code as if you'd typed it in:
Python
for i in range(360):
s = make_dot_string(i) print(s)

보시다시피 이 코드는 잘 작동하지만 출력이 별로 좋지 않습니다.
for 루프의 다른 단계 값은 더 많은 코사인 파동을 표시합니다.
전체 for 루프는 REPL 기록에서 단일 단위로 사용할 수 있습니다.
돌아가서 원하는 대로 변경한 다음 기능을 다시 테스트할 수 있습니다.
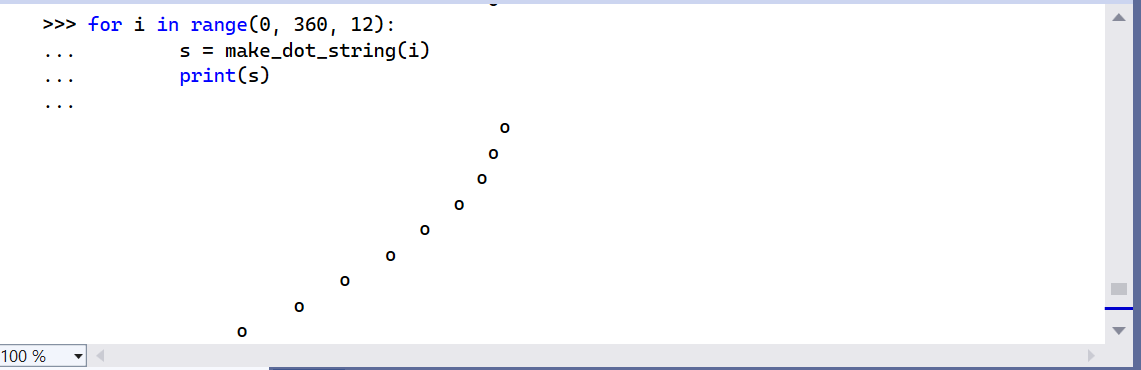
먼저 for 루프를 불러오려면 위쪽 화살표를 누르세요.
왼쪽 또는 오른쪽 화살표를 눌러 코드를 탐색할 수 있습니다(그렇게 하기 전까지는 위쪽 및 아래쪽 화살표가 기록을 계속 순환합니다).
범위 지정을 탐색하여 범위(0, 360, 12)로 변경합니다.
그런 다음 코드의 아무 곳에서나 Ctrl+Enter를 눌러 전체 문을 다시 실행합니다.
As you can see, this code works fine but its output isn't inspiring. A different step value in the for loop would show more of the cosine wave. The entire for loop is available in the REPL history as a single unit. You can go back and make whatever changes you want and then test the function again. Press the up arrow to first recall the for loop. You can navigate in the code by pressing the left or right arrows (until you do so, the up and down arrows continue to cycle through the history). Navigate to and change the range specification to range(0, 360, 12). Then press Ctrl+Enter anywhere in the code, to run the whole statement again:
가장 마음에 드는 값을 찾을 때까지 다양한 단계설정을 실험하는 과정을 반복합니다.
예를 들어 range(0, 1800, 12) 같이 범위를 늘려 파도가 반복되도록 할 수도 있습니다.
Interactive Window에서 작성한 코드가 만족스러우면 선택하세요.
그런 다음 코드를 마우스 오른쪽 버튼으로 클릭하고 Copy Code (Ctrl+Shift+C)를 선택.
마지막으로 선택한 코드를 편집기에 붙여넣습니다.
Visual Studio의 이 특수 기능이 >>> 및 ... 프롬프트와 함께 모든 출력을 자동으로 생략하는 방법에 주목하세요.
예를 들어 아래 이미지는 프롬프트와 출력이 포함된 선택 항목에서 Copy Code command을 사용하는 것을 보여줍니다.
Repeat the process to experiment with different step settings until you find a value you like best. You can also make the wave repeat by lengthening the range, for example, range(0, 1800, 12).
When you're satisfied with the code you wrote in the Interactive Window, select it. Next, right-click the code and choose Copy Code (Ctrl+Shift+C). Finally, paste the selected code into the editor. Notice how this special feature of Visual Studio automatically omits any output, along with the >>> and ... prompts. For example, the image below shows using the Copy Code command on a selection that includes prompts and output:

When you paste into the editor, you get only the code:
Python
for i in range(0, 1800, 12):
s = make_dot_string(i) print(s)
프롬프트 및 출력 등 Interactive Window의 정확한 내용을 복사하려면 표준 Copy command을 사용.
지금까지 수행한 작업은 대화형 창의 빠른 REPL 환경을 사용하여 작은 코드 조각에 대한 세부 정보를 처리한 다음 해당 코드를 프로젝트 소스 파일에 편리하게 추가하는 것입니다.
이제 Ctrl+F5 (or Debug > Start without Debugging)를 사용하여 코드를 다시 실행하면 원하는 정확한 결과를 볼 수 있습니다.
If you want to copy the exact contents of the Interactive Window, including prompts and output, use the standard Copy command.
What you've done is use the rapid REPL environment of the Interactive Window to work out the details for a small piece of code, then you conveniently added that code to your project's source file. When you now run the code again with Ctrl+F5 (or Debug > Start without Debugging), you see the exact results you wanted.
Next step
Go deeper
댓글