Tutorial: Get started with the Django web framework in Visual Studio
자습서: Visual Studio에서 Django 웹프레임워크 시작하기
- Article
- 09/08/2023
In this article
- Prerequisites
- Step 1-1: Create a Visual Studio project and solution
- Step 1-2: Examine the Git controls and publish to a remote repository
- Step 1-3: Create the virtual environment and exclude it from source control
Applies to:

Visual Studio

Visual Studio for Mac

Visual Studio Code
Django는 빠르고 안전하며 확장가능한 웹개발을 위해 설계된 고급 Python 프레임워크.
이 튜토리얼에서는 프로젝트 템플릿 맥락에서 Django 프레임워크를 살펴봅니다.
Visual Studio는 Django 기반 웹앱 생성을 간소화하기 위한 프로젝트 템플릿을 제공.
Django is a high-level Python framework designed for rapid, secure, and scalable web development. This tutorial explores the Django framework in the context of the project templates. Visual Studio provides the project templates to streamline the creation of Django-based web apps.
이 자습서에서는 다음 방법을 알아봅니다:
In this tutorial, you learn how to:
- "Blank Django Web Project" 템플릿을 사용, Git 리포지토리에 기본 Django 프로젝트를 만듭니다 Create a basic Django project in a Git repository using the "Blank Django Web Project" template (step 1).
- 페이지 1개인 Django 앱을 만들고 템플릿을 사용, 해당 페이지를 render. Create a Django app with one page and render that page using a template (step 2).
- 정적 static 파일을 제공하고, 페이지를 추가하고, 템플릿 상속을 사용. Serve static files, add pages, and use template inheritance (step 3).
- Django Web Project 템플릿을 사용, 여러 페이지와 반응형 디자인이 포함된 앱 만들기 Use the Django Web Project template to create an app with multiple pages and responsive design (step 4).
- 사용자 인증. Authenticate users (step 5).
Prerequisites
Visual Studio 2022 on Windows with the following options:
- Python development workload (installer의 Workload tab). 자세한 지침은 Install Python support in Visual Studio 참조 The Python development workload (Workload tab in the installer). For more instructions, see Install Python support in Visual Studio.
- Code tools 아래의 Individual components tab에 있는 Windows용 Git. Git for Windows on the Individual components tab under Code tools.
Django 프로젝트 템플릿에는 이전 버전의 Python Tools for Visual Studio도 포함되어 있습니다.
템플릿 세부정보는 이 튜토리얼의 설명내용과 다를 수 있습니다(특히 이전 버전의 Django 프레임워크와 다를 수 있음).
Python개발은 현재 Mac용 Visual Studio에서 지원되지 않습니다.
Mac 및 Linux에서는 Python extension in Visual Studio Code 을 사용.
Django project templates also include earlier versions of Python Tools for Visual Studio. The template details might differ from what's discussed in this tutorial (especially different with earlier versions of the Django framework).
Python development isn't presently supported in Visual Studio for Mac. On Mac and Linux, use the Python extension in Visual Studio Code.
"Visual Studio 프로젝트" 및 "Django 프로젝트"
"Visual Studio projects" and "Django projects"
Django 용어에서 "Django project"에는 하나 이상의 "앱"과 함께 여러 사이트 수준 configuration files이 있습니다.
전체 웹애플리케이션을 생성하려면 이들 앱을 웹호스트에 배포하면 됩니다.
Django project에는 여러 앱이 포함될 수 있으며, 동일한 앱이 여러 Django 프로젝트에 있을 수 있습니다.
Visual Studio projects에는 여러 앱과 함께 Django 프로젝트가 포함될 수 있습니다.
이 자습서에서 단지 "project"를 언급하면 이는 Visual Studio 프로젝트를 가리킴.
웹애플리케이션의 "Django project" 부분을 언급할 때는 구체적으로 "Django project"를 지칭.
이 자습서를 진행하면서 3개의 개별 Django project가 포함된 1개의 Visual Studio 솔루션을 만듭니다.
각 프로젝트 별로 Django 앱이 1개 포함되어 있슴.
해당 프로젝트를 동일한 솔루션에 유지하면서 비교를 위해 서로 다른 파일 간에 쉽게 전환할 수 있습니다.
In Django terminology, a "Django project" has several site-level configuration files along with one or more "apps." To create a full web application, you can deploy these apps to a web host. A Django project can contain multiple apps, and the same app can be in multiple Django projects.
A Visual Studio project can contain the Django project along with multiple apps. Whenever this tutorial refers to just a "project," it's referring to the Visual Studio project. When it refers to the "Django project" portion of the web application, it's referring to a "Django project" specifically.
Over the course of this tutorial, you'll create a single Visual Studio solution that contains three separate Django projects. Each project contains a single Django app. You can easily switch between different files for comparison, by keeping the projects in the same solution.
Step 1-1: Visual Studio 프로젝트 및 솔루션 만들기Create a Visual Studio project and solution
명령줄에서 Django로 작업할 때, 일반적으로 django-admin startproject <project_name> command을 실행하여 프로젝트를 시작합니다.
Visual Studio에서 "Blank Django Web Project" 템플릿은 Visual Studio 프로젝트 및 솔루션 내에서 동일한 구조를 제공합니다.
When working with Django from the command line, you usually start a project by running the django-admin startproject <project_name> command. In Visual Studio, the "Blank Django Web Project" template provides the same structure within a Visual Studio project and solution.
- Visual Studio에서 File > New > Project를 선택, "Django" 검색 후, Blank Django Web Project 템플릿을 선택한 후 Next을 선택 In Visual Studio, select File > New > Project, search for "Django", and select the Blank Django Web Project template, then select Next.
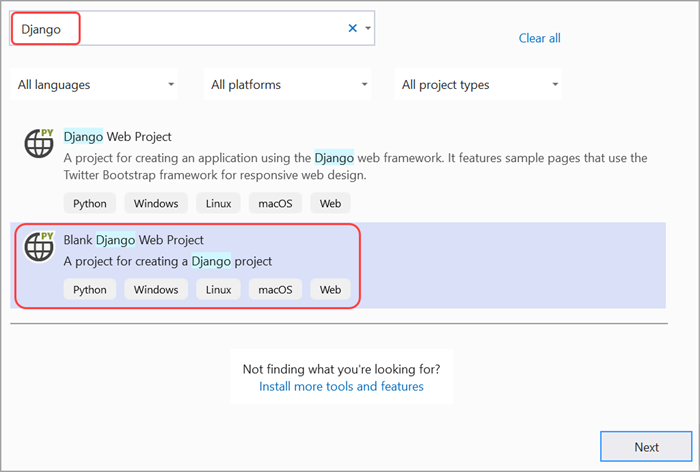
2. 다음 정보 입력 후, Create를 선택 Enter the following information and then select Create:
- Project Name: Visual Studio 프로젝트 이름을 BasicProject로 설정. 이 이름은 Django 프로젝트에도 사용. Set the name of the Visual Studio project to BasicProject. This name is also used for the Django project.
- Location: Specify a location in which to create the Visual Studio solution and project.
- Solution: Leave this control set to default Create new solution option.
- Solution name: 이 자습서의 여러 프로젝트에 대한 컨테이너로서 솔루션에 적합한 LearningDjango 로 설정 Set to LearningDjango, which is appropriate for the solution as a container for multiple projects in this tutorial.
하나 더... One more thing...
이 프로젝트를 실행하기 전, super user를 생성할 수 있습니다.
Before running this project, you may want to create a super user.
데이터베이스 동기화
Synchronize the Database
이 프로젝트에는 데이터베이스에 대한 default settings이 있습니다(sqlite를 사용).
super user가 필요한 경우, 프로젝트 실행전, super user를 만들어야 함.
This project has default settings for the database (it uses sqlite). If you need a super user, you'll need to create one before running the project.
- Solution Explorer를 엽니다 Open Solution Explorer.
- 프로젝트 노드를 마우스오른쪽버튼으로 클릭, Python->Django Create Superuser 을 선택 Right-click the project node and select Python->Django Create Superuser.
- 메시지가 나타나면 계정 세부정보를 입력. 이렇게 하면 새 계정이 생성되며 세부정보가 기존계정과 일치할 필요는 없슴 Enter account details when prompted. This creates a new account, and the details do not need to match any of your existing accounts.
Step 1-2: Git 컨트롤 검사하고 원격저장소에 게시 Examine the Git controls and publish to a remote repository
이 단계에서 Visual Studio의 Git controls과 Team Explorer에 익숙짐. Team Explorer 창을 사용, 소스컨트롤 작업을 수행.
In this step, you'll familiarize yourself with Visual Studio's Git controls and Team Explorer. With the Team Explorer window, you'll work with the source control.
해당 프로젝트를 로컬 소스컨트롤로 commit 하려면 다음을 수행:
To commit the project to your local source control:
a. Visual Studio 주 창의 아래쪽 모서리에 있는 Add to Source Control command을 선택 Select Add to Source Control command at the bottom corner of the Visual Studio main window.

b. 그런 다음 Git 옵션을 선택 Then, select the Git option.
c. 이제 새 repository를 생성하고 푸시할 수 있는 Create Git repository window으로 이동 Now, you're taken to the Create Git repository window, where you can create and push a new repository.
2. repository를 생성하면 하단에 새 Git controls 세트가 나타납니다. 이러한 컨트롤은 왼쪽에서 오른쪽으로 푸시되지 않은 커밋, 커밋되지 않은 변경사항, 현재 분기 및 저장소이름을 표시 After creating a repository, a set of new Git controls appears at the bottom. From left to right, these controls show unpushed commits, uncommitted changes, the current branch, and the name of the repository.

3. Git changes button 선택. 그러면 VS가 Team Explorer에서 Git Changes page를 엽니다. 새로 생성된 프로젝트가 이미 자동으로 소스컨트롤에 커밋되었으므로 보류 중인 변경사항이 표시되지 않습니다. Select the Git changes button. Visual Studio then opens the Git Changes page in Team Explorer. You don't see any pending changes as the newly created project is already committed to source control automatically.

4. VS 상태 표시줄에서, commits button (the up arrow with 2) 를 선택하여, Team Explorer에서 Synchronization page를 엽니다. Synchronization page는 로컬 저장소를 다른 원격 저장소에 게시하는 쉬운 옵션을 제공. On the Visual Studio status bar, select the unpushed commits button (the up arrow with 2) to open the Synchronization page in Team Explorer. The Synchronization page provides easy options to publish the local repository to different remote repositories.
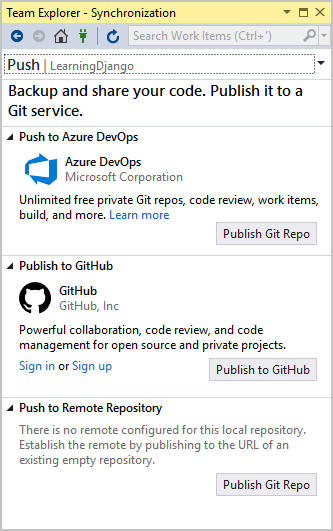
프로젝트에 원하는 서비스를 선택할 수 있습니다.
이 자습서에서는 자습서의 완성된 샘플코드가 Microsoft/python-sample-vs-learning-django 리포지토리에 유지관리되는 GitHub의 사용방법을 보여줍니다.
You can choose any service you want for your projects. This tutorial shows the use of GitHub, where the completed sample code for the tutorial is maintained in the Microsoft/python-sample-vs-learning-django repository.
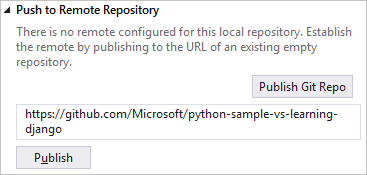
5. Publish controls 중 하나를 선택하면, Team Explorer에 추가 정보를 묻는 메시지가 표시됩니다. 예를 들어 이 튜토리얼의 샘플을 게시할 때 리포지토리 자체를 먼저 생성해야 하며, 이 경우 Push to Remote Repository option이 사용되었습니다.
When selecting any of the Publish controls, Team Explorer prompts you for more information. For example, when publishing the sample for this tutorial, the repository itself has to be created first, in which case, the Push to Remote Repository option was used with the repository's URL.
기존 리포지토리가 없는 경우 GitHub에 게시 및 Azure DevOps에 푸시 옵션을 사용하면 Visual Studio 내에서 직접 리포지토리를 만들 수 있습니다.
If you don't have an existing repository, the Publish to GitHub and Push to Azure DevOps options let you create one directly from within Visual Studio.
6. 이 자습서를 진행하면서 주기적으로 Visual Studio의 컨트롤을 사용하여 변경 사항을 커밋하고 푸시하는 습관을 들이십시오. 이 튜토리얼에서는 적절한 지점을 알려줍니다.
6. As you work through this tutorial, get into the habit of periodically using the controls in Visual Studio to commit and push changes. This tutorial reminds you at appropriate points.
Tip
팀 탐색기 내에서 빠르게 탐색하려면 헤더(위 이미지에서 변경사항 또는 푸시라고 읽음)를 선택하여 사용 가능한 페이지의 팝업 메뉴를 확인하세요.
To quickly navigate within Team Explorer, select the header (that reads Changes or Push in the images above) to see a pop-up menu of the available pages.
Question: 프로젝트 시작부터 소스제어를 사용하면 어떤 이점이 있나요? What are some advantages of using source control from the beginning of a project?
답변: 특히 원격저장소도 사용하는 경우 처음부터 소스제어는 프로젝트의 정기적 오프사이트 백업을 제공합니다.
로컬파일시스템에서 프로젝트를 유지하는 것과 달리 소스제어는 완전한 변경기록을 제공하고 단일파일이나 전체 프로젝트를 이전 상태로 쉽게 되돌릴 수 있는 기능을 제공합니다.
변경기록은 회귀(테스트 실패)의 원인을 파악하는 데 도움이 됩니다.
여러 사람이 한 프로젝트에서 작업할 때 소스제어는 덮어쓰기를 관리하고 충돌해결을 제공합니다.
마지막으로, 기본적으로 자동화 형태인 소스제어는 빌드, 테스트 및 릴리스관리 자동화를 설정합니다.
프로젝트에 DevOps를 사용하는 첫 번째 단계입니다.
진입장벽이 낮기 때문에 처음부터 소스제어를 사용하지 않을 이유가 없습니다.
자동화로서의 소스제어에 대한 자세한 내용은 웹 앱에도 적용되는 모바일 앱용으로 작성된 MSDN Magazine의 기사 The Source of Truth: The Role of Repositories in DevOps을 참조.
Answer: Source control from the start, especially if you also use a remote repository, provides a regular offsite backup of your project. Unlike maintaining a project on a local file system, source control provides a complete change history and the easy ability to revert a single file or the whole project to its previous state. The change history helps determine the cause of regressions (test failures). When multiple people are working on a project, the source control manages the overwrite and provides conflict resolution.
Lastly, source control, which is fundamentally a form of automation, sets you up for automating builds, testing, and release management. It's the first step in using DevOps for a project. There's really no reason to not use source control from the beginning as the barriers to entry are low.
For further discussion on source control as automation, see The Source of Truth: The Role of Repositories in DevOps, an article in MSDN Magazine written for mobile apps that also applies to web apps.
Question: Visual Studio가 새 프로젝트를 자동 커밋하지 못하게 할 수 있나요? Can I prevent Visual Studio from autocommitting a new project?
Answer: 예. 자동커밋을 비활성화하려면 팀탐색기의 설정페이지로 이동하세요. Git > 전역 설정을 선택하고 기본적으로 병합 후 변경사항 커밋이라는 옵션을 선택 취소한 다음 업데이트를 선택합니다.Yes. To disable autocommit, go to the Settings page in Team Explorer. Select Git > Global settings, clear the option labeled Commit changes after merge by default, and then select Update.
Step 1-3: 가상환경을 생성해서 그것을 소스컨트롤에서 제외하기 Create the virtual environment and exclude it from source control
이제 프로젝트에 대한 소스컨트롤을 구성했으므로 프로젝트에 필요한 Django 패키지가 포함된 가상환경을 만들 수 있습니다.
그런 다음 Team Explorer를 사용하여 소스컨트롤로부터 environment 폴더를 제외할 수 있습니다.
Now that you've configured source control for your project, you can create the virtual environment that contains the necessary Django packages for the project. You can then use Team Explorer to exclude the environment's folder from source control.
1. Solution Explorer에서, Python Environments node를 마우스오른쪽단추로 클릭하고 Add Environment를 선택 In Solution Explorer, right-click the Python Environments node and select Add Environment.
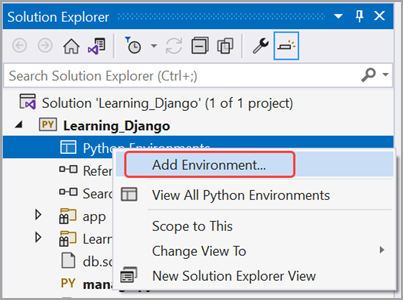
2. Add Virtual Environment dialog에서 Create를 선택하여 기본값을 적용 (원하는 경우 가상환경 이름 변경가능. 하위 폴더 이름만 변경되지만 env는 표준규칙) Select Create to accept the defaults, in Add Virtual Environment dialog. (You can change the name of the virtual environment if you want, which just changes the name of its subfolder, but env is a standard convention.)
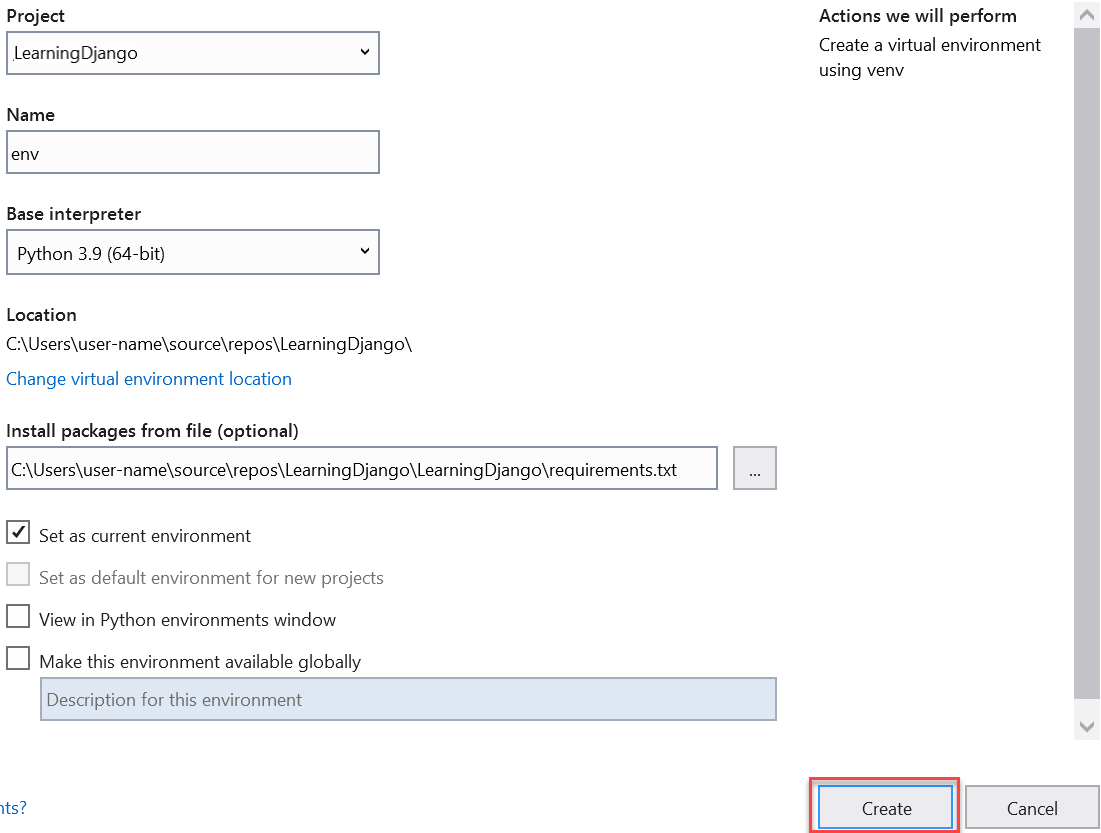
3. 메시지가 표시되면 관리자 권한에 동의한 다음, VS가 패키지를 다운로드하고 설치하는 동안 몇 분 정도 기다립니다.
이 시간 동안 수천 개의 파일이 여러 하위 폴더로 전송됩니다.
VS Output 창에서 진행 상황을 확인할 수 있습니다.
기다리는 동안 이어지는 질문 섹션을 숙고해 보세요.
Consent to administrator privileges if prompted, then wait a few minutes while Visual Studio downloads and installs packages. During this time, thousands of files are transferred to many subfolders. You can see the progress in the Visual Studio Output window. While you're waiting, ponder the Question sections that follow.
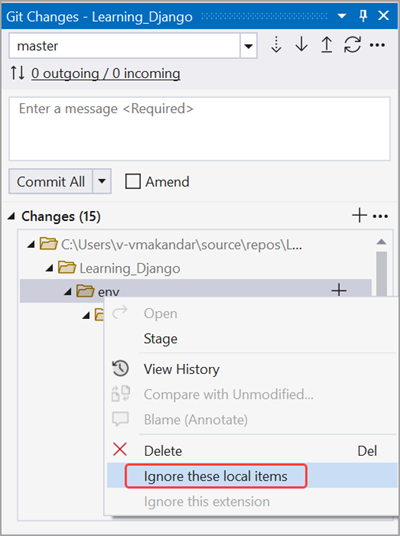
4. status bar의 VS Git controls에서, changes indicator(99* 표시)를 선택하면 Team Explorer에서 Changes 페이지가 열립니다.
가상환경을 생성하면 수천 가지 변경사항이 발생하지만 사용자(또는 프로젝트를 복제하는 다른 사람)가 항상 requirements.txt에서 환경을 다시 생성할 수 있으므로 소스 컨트롤에 이들 변경사항을 포함할 필요가 없습니다.
On the Visual Studio Git controls (on the status bar), select the changes indicator (that shows 99*) which opens the Changes page in Team Explorer.
Creation of the virtual environment brought in thousands of changes, but you don't need to include any of them in source control because you (or anyone else cloning the project) can always recreate the environment from requirements.txt.
5. 가상환경을 제외하려면 env 폴더를 마우스 오른쪽 버튼으로 클릭하고, Ignore these local items를 선택.
To exclude the virtual environment, right-click the env folder and select Ignore these local items.
6. 가상환경을 제외하고나면, 프로젝트 파일과 .gitignore 파일만 변경됨.
.gitignore 파일에는 가상환경폴더에 대한 추가항목이 포함되어 있슴.
파일을 두 번 클릭하면 차이점을 볼 수 있습니다.
After excluding the virtual environment, the only remaining changes are to the project file and .gitignore file. The .gitignore file contains an added entry for the virtual environment folder. You can double-click the file to see a diff.
7. 커밋 메시지를 입력하고 Commit All button을 선택한 다음, 커밋을 원격저장소에 푸시합니다.
Enter a commit message and select the Commit All button, then push the commits to your remote repository.
Question: Why do I want to create a virtual environment?
가상환경 만들어야 하는 이유?
답변: 가상환경은 앱의 정확한 종속성을 격리하는 좋은 방법입니다.
이러한 격리는 글로벌 Python 환경 내에서 충돌을 방지하고 테스트와 협업을 모두 지원합니다.
시간이 지나면서 앱 개발할 때 항상 유용한 Python 패키지를 많이 가져오게 됩니다.
프로젝트별 가상환경에 패키지를 유지하여 프로젝트의 requirements.txt file을 쉽게 업데이트할 수 있습니다.
requirements.txt file은 소스컨트롤에 포함된 환경을 설명합니다.
프로젝트가 빌드서버, 배포서버 및 기타 개발 컴퓨터 등 다른 컴퓨터에 복사되면 requirements.txt 만 사용하여 환경을 쉽게 다시 만들 수 있습니다(이것이 환경이 소스 제어에 있을 필요가 없는 이유).
자세한 내용은 Use virtual environments을 참조하세요.
Answer: A virtual environment is a great way to isolate your app's exact dependencies. Such isolation avoids conflicts within a global Python environment, and aids both testing and collaboration. Over time, as you develop an app, you invariably bring in many helpful Python packages. You can easily update the project's requirements.txt file by keeping packages in a project-specific virtual environment. The requirements.txt file describes the environment, which is included in the source control. When the project is copied to any other computers, including build servers, deployment servers, and other development computers, it's easy to recreate the environment using only requirements.txt (which is why the environment doesn't need to be in source control). For more information, see Use virtual environments.
Question: How do I remove a virtual environment that's already committed to source control?
Answer: 먼저 .gitignore file을 편집하여 폴더를 제외하세요.
끝에 # Python Tools for Visual Studio (PTVS) 주석이 있는 섹션을 찾아 가상환경 폴더에 대한 새 줄(예: /BasicProject/env)을 추가. (VS는 솔루션 탐색기에 파일을 표시하지 않습니다. 파일을 직접 열려면 File > Open > File로 이동. 팀 탐색기에서 파일을 열 수도 있습니다. 설정 페이지로 이동하여 리포지토리 설정을 선택합니다. 이제 탐색합니다. 무시 및 속성 파일 섹션으로 이동하여 .gitignore 옆에 있는 편집 링크를 선택하세요.)
둘째, 명령 창을 열고 BasicProject와 같은 폴더로 이동합니다.
BasicProject 폴더에는 env 등의 가상환경 폴더가 포함되어 있으며, git rm -r env를 실행합니다.
그런 다음 명령줄(git commit -m 'Remove venv')에서 해당 변경사항을 커밋하거나 팀 탐색기의 변경사항 페이지에서 커밋합니다.
First, edit your .gitignore file to exclude the folder. Find the section at the end with the comment # Python Tools for Visual Studio (PTVS) and add a new line for the virtual environment folder, such as /BasicProject/env. (Visual Studio doesn't show the file in Solution Explorer. To open the file directly, go to File > Open > File. You can also open the file from Team Explorer. Go to the Settings page and select Repository Settings. Now, navigate to the Ignore & Attributes Files section and select the Edit link next to .gitignore.)
Second, open a command window, navigate to a folder such as BasicProject. The BasicProject folder contains the virtual environment folder such as env, and run git rm -r env. Then commit those changes from the command line (git commit -m 'Remove venv') or commit from the Changes page of Team Explorer.
Step 1-4: Examine the boilerplate code
프로젝트 생성이 완료되면, 상용구 Django프로젝트 코드(CLI 명령 django-admin startproject <project_name>에 의해 생성된 코드와 동일)를 검사.
Once project creation completes, examine the boilerplate Django project code (which is again the same as generated by the CLI command django-admin startproject <project_name>).
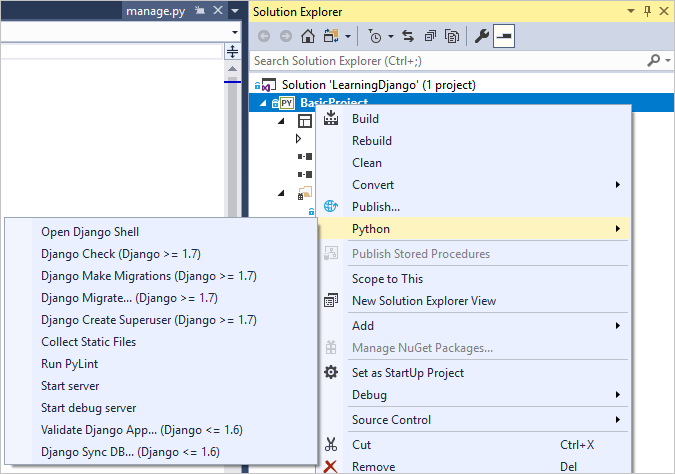
1. 프로젝트의 root에는 VS가 자동으로 프로젝트시작파일로 설정하는 Django 명령줄 관리 유틸리티 manage.py가 있습니다.
python manage.py <command> [options]을 사용하여 명령줄에서 유틸리티를 실행합니다.
일반적 Django 작업을 위해 VS는 편리한 메뉴명령을 제공.
Solution Explorer에서 해당 프로젝트를 마우스오른쪽단추로 클릭하고 Python을 선택하여 list을 확인합니다.
이 자습서를 진행하면서 이들 명령 중 일부를 접하게 될 것입니다. The root of your project has manage.py, the Django command-line administrative utility that Visual Studio automatically sets as the project startup file. You run the utility on the command line using python manage.py <command> [options]. For common Django tasks, Visual Studio provides convenient menu commands. Right-click the project in Solution Explorer and select Python to see the list. You'll come across some of these commands in the course of this tutorial.
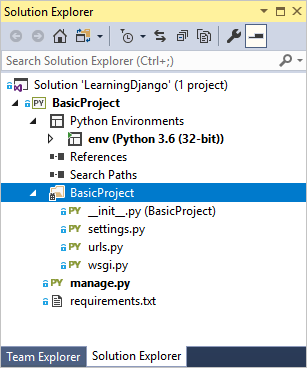
2. 귀하의 프로젝트에는 프로젝트와 이름이 같은 폴더 (BasicProject)가 있습니다.
이 폴더에 basic Django project files이 포함되어 있습니다:
In your project, there's a folder with the same name as the project. It contains the basic Django project files:
- __init.py: 이 폴더가 Python 패키지임을 Python에 알려주는 빈 파일 An empty file that tells Python that this folder is a Python package.
- settings.py: 웹앱 개발과정에서 수정하게 될 Django 프로젝트에 대한 설정 포함 Contains settings for Django project, which you'll modify in the course of developing a web app.
- urls.py: 개발과정에서 수정하게 될 Django 프로젝트의 목차 포함 Contains a table of contents for the Django project, which you'll also modify in the course of development.
- wsgi.py: 해당 프로젝트를 제공하기 위한 WSGI 호환 웹서버의 진입점. 일반적으로 이 파일은 프로덕션 웹서버에 대한 후크를 제공하므로 그대로 둡니다. An entry point for WSGI-compatible web servers to serve your project. You usually leave this file as-is, as it provides the hooks for production web servers.
3. 앞서 언급한 것처럼 VS 템플릿은 Django 패키지 종속성을 지정하는 requirements.txt file도 프로젝트에 추가합니다.
이 파일이 있으면 프로젝트를 처음 만들 때 가상환경을 만들도록 초대됩니다.
As noted earlier, the Visual Studio template also adds a requirements.txt file to your project specifying the Django package dependency. The presence of this file is what invites you to create a virtual environment when first creating the project.
Question: Can Visual Studio generate a requirements.txt file from a virtual environment after I install other packages?
Answer: 예. Python Environments node를 확장하고, 가상환경을 마우스 오른쪽 버튼으로 클릭한 후 Generate requirements.txt command을 선택.
환경을 수정할 때 이 명령을 주기적으로 사용하고 해당 환경에 따라 달라지는 다른 코드 변경사항과 함께 requirements.txt 변경사항을 소스컨트롤에 커밋하는 것이 좋습니다.
빌드 서버에서 지속적 통합을 설정하는 경우, 환경을 수정할 때마다 파일을 생성하고 변경사항을 커밋해야 합니다.
Yes. Expand the Python Environments node, right-click your virtual environment, and select the Generate requirements.txt command. It's good to use this command periodically as you modify the environment, and commit changes to requirements.txt to source control along with any other code changes that depend on that environment. If you set up continuous integration on a build server, you should generate the file and commit changes whenever you modify the environment.
Step 1-5: Run the empty Django project
1. VS에서 Debug > Start Debugging (F5) 을 선택하거나 toolbar에서 Web Server button를 사용(표시되는 브라우저는 다를 수 있음).
In Visual Studio, select Debug > Start Debugging (F5) or use the Web Server button on the toolbar (the browser you see might vary):

2. 서버를 실행한다는 것은 manage.py runserver <port> 명령을 실행하는 것을 의미하는데, 이는 Django에 내장된 개발서버를 시작합니다.
VS에서 시작 파일이 없다는 메시지와 함께 Failed to start debugger가 표시되면 Solution Explorer에서 manage.py를 마우스 오른쪽 단추로 클릭하고 Set as Startup File을 선택합니다.
Running the server means to run the command manage.py runserver <port>, which starts Django's built-in development server. If Visual Studio says Failed to start debugger with a message about having no startup file, right-click manage.py in Solution Explorer and select Set as Startup File.
3. 서버를 시작하면 서버로그도 표시하는 콘솔 창이 열립니다.
VS는 자동으로 http://localhost:<port>에 대한 브라우저를 엽니다.
Django 프로젝트에는 앱이 없기 때문에 Django는 지금까지의 작업이 제대로 작동하는지 확인하기 위해 기본 페이지만 표시합니다.
When you start the server, you see a console window opens that also displays the server log. Visual Studio automatically opens a browser to http://localhost:<port>. Since the Django project has no apps, Django shows only a default page to confirm that what you have so far is working fine.

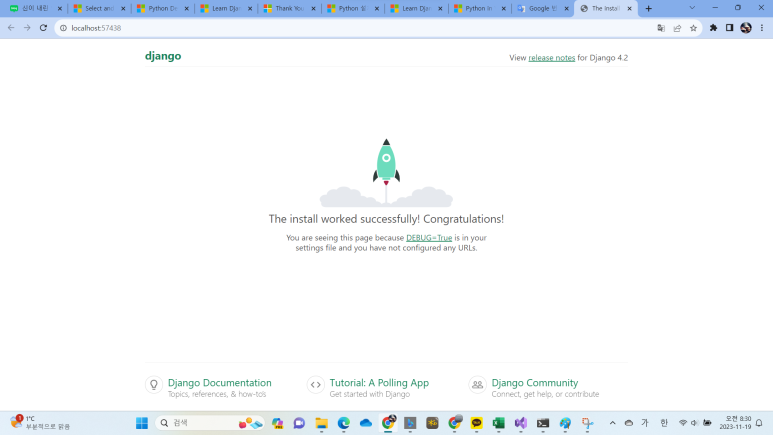
The install worked successfully! Congratulations!
You are seeing this page because DEBUG=True is in your settings file and you have not configured any URLs.
설치가 성공적으로 완료되었습니다! 축하해요!
DEBUG=True가 설정 파일에 있고, URL을 구성하지 않았기 때문에 이 페이지가 표시됩니다.
강아지 발작 경련
4. 완료되면 콘솔 창을 닫거나 VS에서 Debug > Stop Debugging command을 사용하여 서버를 중지.
When you're done, stop the server by closing the console window, or by using the Debug > Stop Debugging command in Visual Studio.
Question: Is Django a web server and a framework?
Answer:
예, 아니오.
Django에는 개발 적으로 사용되는 웹서버가 내장되어 있습니다.
이 웹서버는 VS에서 디버깅할 때와 같이 웹앱을 로컬로 실행할 때 사용됩니다.
그러나 웹 호스트에 배포하면 Django는 대신 호스트의 웹서버를 사용합니다.
Django 프로젝트의 wsgi.py 모듈은 프로덕션 서버에 대한 연결을 관리합니다.
Yes and no. Django has a built-in web server that's used for development purposes. This web server is used when you run the web app locally, such as when debugging in Visual Studio. When you deploy to a web host, however, Django uses the host's web server instead. The wsgi.py module in the Django project takes care of hooking into the production servers.
Question: What's the difference between using the Debug menu commands and the server commands on the project's Python submenu?
답변: 디버그 메뉴 명령 및 도구 모음 버튼 외에도 프로젝트 상황에 맞는 메뉴에서 Python > 서버 실행 또는 Python > 디버그 서버 실행 명령을 사용하여 서버를 시작할 수도 있습니다.
두 명령 모두 실행 중인 서버의 로컬 URL(localhost:port)을 볼 수 있는 콘솔 창을 엽니다.
그러나 해당 URL을 사용하여 브라우저를 수동으로 열어야 하며 디버그 서버를 실행해도 Visual Studio 디버거가 자동으로 시작되지 않습니다.
원하는 경우 디버그 > 프로세스에 연결 명령을 사용하여 실행 중인 프로세스에 디버거를 연결할 수 있습니다.
Answer: In addition to the Debug menu commands and toolbar buttons, you can also launch the server using the Python > Run server or Python > Run debug server commands on the project's context menu. Both commands open a console window in which you'll see the local URL (localhost:port) for the running server. However, you must manually open a browser with that URL, and running the debug server doesn't automatically start the Visual Studio debugger. If you want, you can attach a debugger to the running process by using the Debug > Attach to Process command.
Next steps
At this point, the basic Django project doesn't contain any apps. You'll create an app in the next step. Since you'll work with Django apps more than the Django project, you won't need to know more about the boilerplate files for now.
Create a Django app with views and page templates
Go deeper
- Django project code: Writing your first Django app, part 1 (docs.djangoproject.com)
- Administrative utility: django-admin and manage.py (docs.djangoproject.com)
- Tutorial source code on GitHub: Microsoft/python-sample-vs-learning-django
댓글